


After-sales problems

After-sales problems
Support and Assistance
1. 5 Ways to Fix Wireless CarPlay Not Connecting
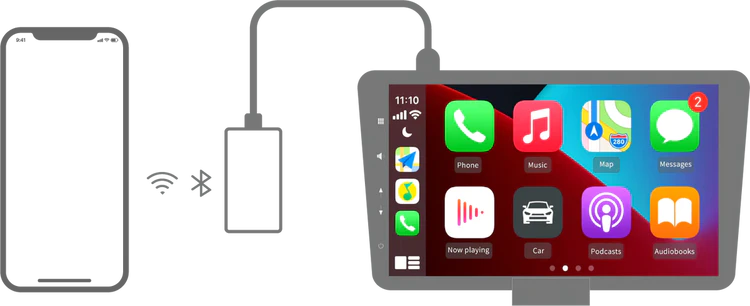
Apple CarPlay is a safe, hands-free way to access your iPhone apps while driving. With Apple CarPlay, you can use your phone to make calls, send messages, and listen to music. But sometimes Apple CarPlay constantly disconnects , doesn't open properly, or you can't hear anything when CarPlay is connected. You might find it really frustrating to sit in your car for hours, trying to figure out why your wireless CarPlay isn't working. But don't worry too much. In this article, we'll look at the causes of Apple CarPlay malfunctions and how to fix them.
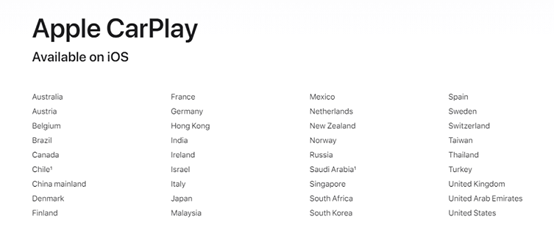
Check that your country (region), phone, and car support Apple CarPlay
You must confirm that your country (region), phone and car support Apple CarPlay.
-
The image below lists the countries and regions supported by CarPlay
- iPhone 5 with iOS 9 or later
- List of 2022 cars offering wireless CarPlay
Cars offering wireless CarPlay for 2024:
- Acura: MDX, RDX
- Audi: A3, A4, A5, A6, A7, A8, E-Tron, E-Tron GT, Q3, Q5, Q7, Q8
- BMW: 2 Series, 3 Series, 4 Series, 5 Series, 7 Series, 8 Series, iX, i4, X3, X4, X5, X6, X7, Z4, X1, X2
- Buick: Enclave, Encore GX, Envision
- Cadillac: CT4, CT5, Escalade/Escalade ESV, XT4, XT5, XT6
- Chevrolet: Blazer, Bolt EV, Bolt EUV, Camaro, Corvette, Equinox, Malibu, Silverado 1500, Silverado 1500 LTD, Silverado 2500/3500, Suburban/Tahoe, Trailblazer, Traverse
- Chrysler: Pacifica
- Dodge: Durango
- Ford: Bronco, Edge, E-Transit, Expedition/Expedition Max, F-150, F-150 Lightning, Mustang Mach-E
- GMC: Acadia, Hummer EV, Sierra 1500, Sierra 1500 LTD, Terrain, Yukon/Yukon XL
- Honda: Accord, Civic
- Hyundai: Accent, Elantra, Ioniq (excludes Ioniq 5), Kona, Kona EV, Palisade, Santa Cruz, Santa Fe, Sonata, Tucson, Venue
- Infiniti: Q50, Q60, QX50, QX55, QX60, QX80
- Jeep: Compass, Grand Cherokee/Grand Cherokee L, Wagoneer/Grand Wagoneer
- Kia: Carnival, Forte, K5, Niro, Rio, Sorento
- Lincoln: Navigator, Nautilus
- Maserati: Ghibli, Levante, MC20, Quattroporte
- Nissan: Armada, Pathfinder, Rogue
- Porsche: 911, Cayenne, Panamera, Taycan, Macan
- Ram: 1500, 2500/3500, ProMaster
- Toyota: Tundra, Supra
- Volkswagen: Arteon, Atlas/Atlas Cross Sport, Golf GTI/Golf R, ID.4, Jetta, Taos, Tiguan
Keep in mind that not all cars from different manufacturers support wireless CarPlay, and support may vary depending on the specific model you purchase. This list may contain omissions; please call your local dealer for more details.
Keep Wi-Fi and Bluetooth enabled
Make sure you have enabled Wi-Fi and Bluetooth on your iPhone. Also, check if you have Airplane Mode enabled, which prevents your phone from establishing any wireless connections.
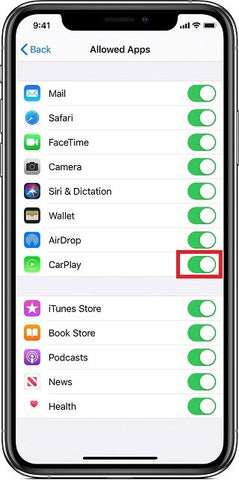
Apple CarPlay is restricted
If CarPlay doesn't detect your iPhone, you need to make sure CarPlay isn't restricted on your phone. On your iPhone, go to Settings > Screen Time > Content & Privacy Restrictions and tap Allowed Apps to enable CarPlay.
The CarPlay connection is locked.
Another possible issue with wireless CarPlay is that the CarPlay connection is locked. If it's locked, CarPlay cannot be activated. You can resolve this by going to Settings > General > CarPlay, selecting your car from the list of connections, and then enabling CarPlay.

Restart and update
Restarting and updating the device may resolve connection problems.
- Restart your iPhone and the home screen
- Update your iPhone
2. Download Autokit APK - Enjoy wireless CarPlay
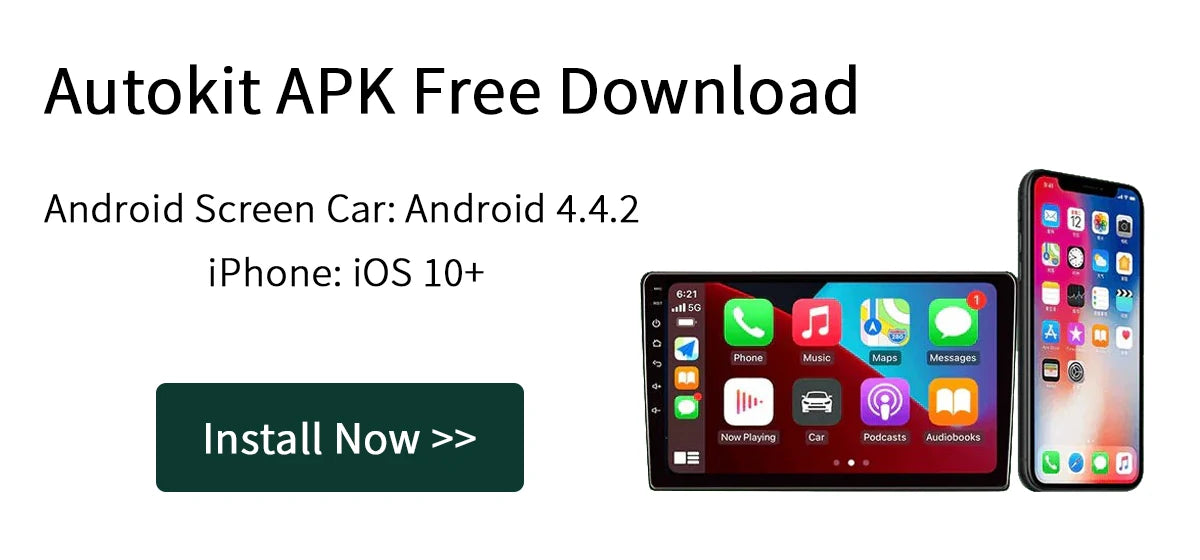

Enable wireless CarPlay in your car with an Android screen!
Autokit Box
Autokit Box Carplay APK.
Car with Android screen: Android 4.4+
iPhone: iOS 10+
About the Autokit Box app
The Autokit application is the exclusive software for the Carplay Autokit Box dongle!
Scan and download

⭐ Buy the best Autokit Box at the Aoocci store and enjoy a limited-time discount with the code CARPLAY ! Act fast.
3. What should I do if the Smart Box fails to reconnect?
What if you return to your vehicle but CarPlay does not connect automatically?
Please note that the Smart Box's Bluetooth automatically turns off if it is not used for a short period. If you encounter this problem, follow the steps below to resolve it:
- Check on your phone >> Bluetooth, double-click on the device (IDCORE) to check if Bluetooth is connected to the Smart Box;

2. If Bluetooth is not connected, check the "Settings" in the vehicle menu , access the "Bluetooth" settings to view paired devices (usually your phone);


3. Select your paired phone, then go to "WiFi CarPlay"; the connection will be restored automatically;

4. If the connection is still not restored, make sure your phone's Wi-Fi is enabled but not connected to any network. Then, access "Wi-Fi CarPlay" in the vehicle's menu to connect your phone again.
4. How to connect and use Android Auto wirelessly
Android Auto is a feature that allows you to easily and safely use your phone in the car, such as music and navigation apps. In most cases, you'll need a cable to connect your phone to your car via a wired connection to get the most out of Android Auto.
However, for some phones and cars, you can more easily use Android Auto's wireless connection. Let's find out if you can try this feature and, if so, how to use Android Auto wirelessly.
Table of Contents
- Wireless Android Auto phone support
- Android Auto's built-in wireless connection method
- What if my car only has a wired connection and no built-in wireless Android Auto?
Wireless Android Auto phone support
An Android phone that meets the requirements for wireless Android Auto is one of the prerequisites. The mobile phone must meet the following requirements:
- Any phone with Android 11.0 and later versions
- A Google or Samsung phone with Android 10.0
- A Samsung Galaxy S8, Galaxy S8+ or Note 8, with Android 9.0
- Supports 5GHz Wi-Fi, as wireless Android Auto uses Bluetooth pairing and 5GHz Wi-Fi for data transmission.
- An active data plan
Android Auto's built-in wireless connection method
Generally, wireless Android Auto is only available on models from around 2021 and later, as it's the most recent feature. Of course, keep in mind that not all vehicles from different manufacturers have wireless Android Auto, and compatibility may vary depending on the specific configuration of the model you purchase.
Which cars offer wireless Android Auto for 2022?
- Acura: MDX, RDX
- Audi: A3, A4, A5, A6, A7, A8, E-Tron, E-Tron GT, Q3, Q5, Q7, Q8
- BMW: 2 Series, 3 Series, 4 Series, 5 Series, 7 Series, 8 Series, iX, i4, X3, X4, X5, X6, X7, Z4
- Buick: Enclave, Encore GX, Envision
- Cadillac: CT4, CT5, Escalade/Escalade ESV, XT4, XT5, XT6
- Chevrolet: Blazer, Bolt EV, Bolt EUV, Camaro, Corvette, Equinox, Malibu, Silverado 1500, Silverado 1500 LTD, Silverado 2500/3500, Suburban/Tahoe, Trailblazer, Traverse
- Chrysler: Pacifica
- Dodge: Durango
- Ford: Bronco, Edge, E-Transit, Expedition/Expedition Max, F-150, F-150 Lightning, Mustang Mach-E
- GMC: Acadia, Hummer EV, Sierra 1500, Sierra 1500 LTD, Terrain, Yukon/Yukon XL
- Honda: Accord, Civic
- Hyundai: Accent, Elantra, Ioniq (excludes Ioniq 5), Kona, Kona EV, Palisade, Santa Cruz, Santa Fe, Sonata, Tucson, Venue
- Infiniti: Q50, Q60, QX50, QX55, QX60, QX80
- Jeep: Compass, Grand Cherokee/Grand Cherokee L, Wagoneer/Grand Wagoneer
- Kia: Carnival, Forte, K5, Niro, Rio, Sorento
- Lincoln: Navigator, Nautilus
- Maserati: Ghibli, Levante, MC20, Quattroporte
- Porsche: 911, Cayenne, Panamera, Taycan
- Ram: 1500, 2500/3500, ProMaster
- Toyota: Tundra
- Volkswagen: Arteon, Atlas/Atlas Cross Sport, Golf GTI/Golf R, ID.4, Jetta, Taos, Tiguan
If your car supports wireless Android Auto, pairing is simple. Each manufacturer's system works differently, but in most cases, you can use wireless Android Auto by following these five steps:
- If you don't have Android Auto on your phone, you need to download Android Auto from the Google Play Store
- Turn on Wi-Fi and Bluetooth on your phone
- Turn on your car > Press the Android Auto button on your multimedia system screen > Press "Connect a phone"
- On your phone > Bluetooth > Pair your car with your phone
- Grant all necessary permissions to Android Auto


Now you can use Android Auto wirelessly without any issues. If you encounter any problems with wireless Android Auto, follow our troubleshooting steps to resolve them .
What if my car only has a wired connection and no built-in wireless Android Auto?
The easiest way to wirelessly add Android Auto to a car that already supports the wired version is to use a USB dongle. Currently, Smart Box offers four products with different features. Here's a comparison of the four products:

5. 11 Ways to Fix Wireless Android Auto Not Working 2025
How do I connect Android Auto wirelessly?
Android Auto serves as a seamless interface for connected cars, extending the functionality of our smartphone operating systems to enhance driving safety. With wireless Android Auto, you can easily connect to a larger touchscreen in your car, getting directions, listening to music from your Spotify playlist, or sending text messages without touching your phone.
To connect Android Auto wirelessly, simply follow these steps:
- Turn on your car and activate Bluetooth on both your phone and your car.
- Connect your phone to your car via Bluetooth.
- Open the Android Auto app on your phone, select the wireless connection option and follow the on-screen instructions to complete the setup.
Once the initial setup is complete, your phone will automatically connect to Android Auto as soon as it is within range.
Why isn't my wireless Android Auto working in the car?
Unfortunately, no wireless system is completely stable. When wireless Android Auto doesn't work or constantly fails, it becomes incredibly frustrating. Several factors can affect your wireless Android Auto connection (such as your mobile phone and car compatibility). If your wireless Android Auto isn't working, you can try the following troubleshooting methods to resolve the issue.
1. Check that you have compatible devices
a) Make sure you are connecting a wireless Android Auto compatible car or aftermarket receiver.
If you are unsure, please contact your local car dealership.
b) Make sure your country supports wireless Android Auto.
Google Assistant for Android Auto is available in the following countries:
- Australia
- Belgium
- Canada (English)
- Denmark
- France
- Germany
- India (English)
- Indonesia
- The Netherlands
- Norway
- Poland
- Portugal
- South Korea
- Suede
- Thailand
- Türkiye
- United Kingdom
- UNITED STATES
c) Make sure your phone has the Android Auto app.
i. Phones running Android 9 need to download the Android Auto app from Google Play. From Android 10 onwards, Android Auto is integrated into phones.
ii. Make sure your phone has 5GHz Wi-Fi.
2. Keep Bluetooth, Wi-Fi, and Location Services enabled
Wireless Android Auto requires pairing your phone with the car via Bluetooth, then transferring data via Wi-Fi. Make sure your car's infotainment system and your phone are connected to the same Wi-Fi network.

3. Check for interference
Wireless signals can be affected by interference. Make sure no other devices are causing signal interference nearby.
4. Check the application permissions
Check if the Android Auto app on your phone has the necessary permissions, including location access.
5. Restart the phone
For most phones, press and hold the power button for 30 seconds or tap Restart on the screen to restart.

6. Restart or reset your infotainment system
Some cars can start cleanly every time you turn the key. Consult your owner's manual to see if there's a way to restart the system.
7. Update the phone's system
The latest operating system improves upon the problems that the older system may have had. To ensure everything works smoothly, make sure your phone's operating system is the latest version.
8. Update Android Auto
Outdated versions of Android Auto may cause various problems on some devices. Update Android Auto to the latest version from the Google Play Store.

9. Clear storage/cache
Clear the cache/storage for the Android Auto app, the Google app, Google Play services, and the Google Play Store.
10. Check your connected car
Go to Settings > Advanced features > Android Auto > Connected car. Check here that your car is not on the rejection list.
11. Uninstall and reinstall Android Auto
Even if your Android Auto is the latest version, the app can become corrupted. Uninstalling and then reinstalling Android Auto might solve the problem.
---------------------
⭐To buy a wireless Android Auto or Apple CarPlay adapter, click on the 🔥 CarPlay Box . Use the promo code "CARPLAY" to get 16% off!

6. How to fix the automatic day/night mode of Google Maps on Android Auto that isn't working
Users who have recently updated Google Maps may encounter an issue with automatic color theme switching when using Android Auto.
Theoretically, by configuring Google Maps and Android Auto, users can activate three color theme modes for Google Maps on the vehicle's screen: automatic, day, and night.
However, after many users updated Google Maps, the color theme became unavailable. Some users are stuck in night mode, others in day mode. Regardless of which mode is blocked, this poses a security risk. In night mode during the day, users may not be able to see the map clearly. In day mode at night, it can be excessively distracting.

Cause of automatic switching failure
According to numerous user reports, it has been confirmed that the cause of the malfunctioning Google Maps night mode on Android Auto is Google Maps itself. The most problematic versions of Google Maps are 11.33.0 and 11.33.1. All users with one of these versions are likely to be stuck in either dark or light mode.

Solutions
-
Restore Google Maps to factory settings
-
Delete Google Maps and reinstall an earlier version
-
Turning the headlights/dashboard lights on and off
If you have set up automatic color theme switching, turning the headlights/dashboard lights on and off will force Google Maps to switch to the correct mode. However, the problem will recur every time you use Android Auto.

Conclusion
Within the Google community, a member of the Android Auto team stated that the issue had been escalated to the responsible team but did not specify when a fix would be available. Hopefully, the malfunction of Google Maps' automatic day/night mode on Android Auto will be resolved in the latest version of Google Maps.
7. Apple CarPlay black screen
Experiencing a black screen while using Apple CarPlay can disrupt the driving experience.

In this article, we will explore the causes of this problem as well as effective solutions.
Reasons for a black screen on Apple CarPlay
1. Connection problems:
One of the main reasons for a black screen on Apple CarPlay is an unstable or faulty connection between your iPhone and the car's USB port. This can be due to a damaged cable, debris in the port, or loose connections.
2. Software compatibility issues:
Outdated software versions on your iPhone or car infotainment system can cause compatibility issues, resulting in a black screen or other malfunctions with Apple CarPlay.
3. Software bugs:
Sometimes, bugs or software conflicts in the iPhone or car's system can cause a black screen on Apple CarPlay . This can happen following updates, changes to settings, or other software-related factors.

Fixing the black screen issue on Apple CarPlay
To resolve black screen issues on Apple CarPlay:
1. Check the connections:
Make sure your iPhone cable is undamaged, clean, and properly connected to the car's USB port. Remove any obstructions.
2. Update the software:
Keep your iPhone and car infotainment system up to date with the latest software versions. Check for updates in your iPhone settings and follow the manufacturer's instructions for car system updates.
3. Restart the devices:
Restart both your iPhone and the car's infotainment system to refresh the software and establish a stable connection.
4. Reset settings:
If the problem persists, reset your iPhone or car infotainment system settings to default to resolve software conflicts.
5. Seek professional assistance:
Contact Apple Support for iPhone troubleshooting. Contact your car manufacturer or dealership for advice on infotainment system issues.
FAQ about the Apple CarPlay black screen
Here are some frequently asked questions regarding the black screen on Apple CarPlay.
1. Why is my Apple CarPlay screen black?
This may be due to software bugs, connection problems, or incompatibilities between devices.
2. How to fix a black screen on Apple CarPlay?
Try restarting your iPhone, updating the software, checking the cables, and resetting the CarPlay system.
3. What are some common reasons why the Apple CarPlay screen goes black?
Software bugs, hardware malfunctions, outdated software, and incompatible applications.
4. Does Apple offer any troubleshooting tips for a black screen on CarPlay?
They may suggest resetting your iPhone, updating the software, and checking for hardware issues.
5. How to prevent the Apple CarPlay screen from going black?
Keep devices up to date, use quality cables, avoid running multiple applications, and maintain a stable connection.
8. Initial User Manual - AI Box
- Connecting the Box to the Heating Unit
- How to use CarPlay/Android Auto wirelessly
- How to use multi-window mode
- How to use the Cast function
- How to use mirroring
- Connecting the Box to the Heating Unit
- Plug one end of the cable into your car's USB port. The USB port may be identified by a smartphone icon.
- Plug the other end of the cable into the USB/Type-C port of the AI Box.


- After the transmission is powered on, it will start automatically and the startup screen will appear on your car's screen.
- The initial identification may take a few minutes. Once the car's screen displays the Box's main interface, the connection is successful.
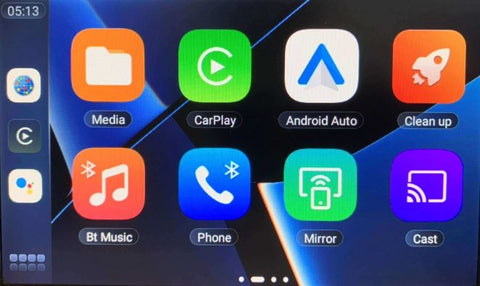
- How to use CarPlay/Android Auto wirelessly
- Activate Bluetooth and Wi-Fi on your phone.
- Click on the CarPlay or Android Auto icon on the Box's main interface to access the connection interface.

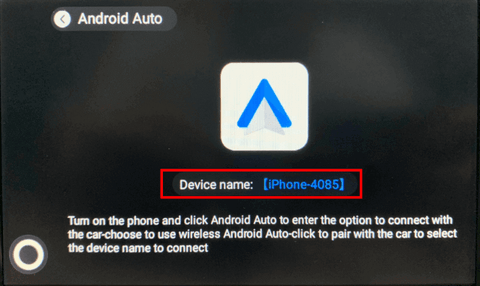
- Next on your phone
- iPhone: Go to Settings > General > CarPlay, and select the device name to connect.
- Android: Click on Android Auto to access the car connection options > Choose to use Android Auto wirelessly > Click to pair with the car and select the device name.
- How to use multi-window mode
- Press the empty area to bring up the Home Button > Press the Home Button.
- Press the multi-window button.
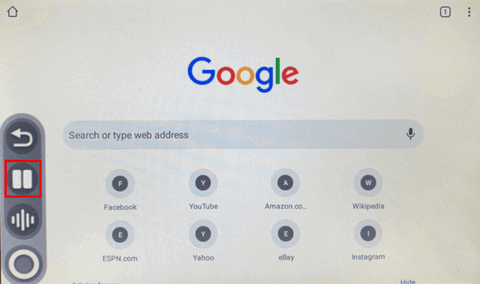
- Tap the application icon.
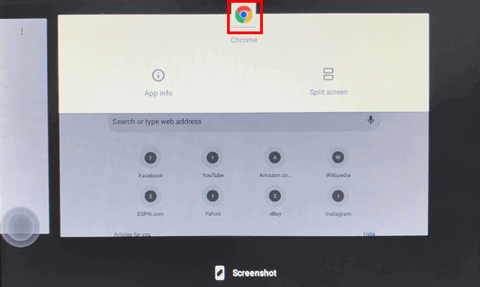
- Select the other window you want.
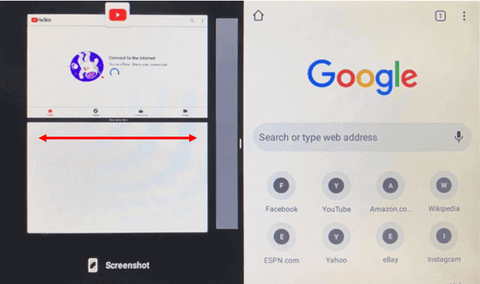
- How to stop multi-window mode > Press and hold the center part and slide left or right.
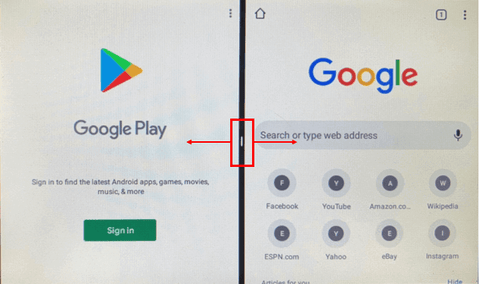
- Press the empty area to bring up the Home Button > Press the Home Button.
- How to use the Cast function
Before you begin, make sure that the Box is connected to the same Wi-Fi network as your phone or that the Box is connected to the phone's access point (Settings > Wi-Fi).- Tap the Cast icon > Check the device name in the upper left corner.
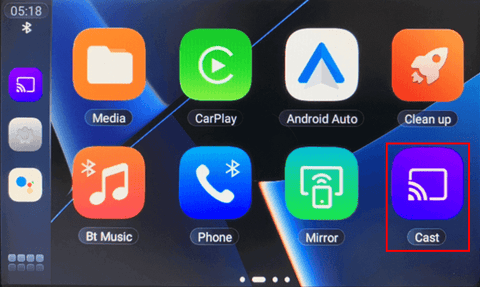
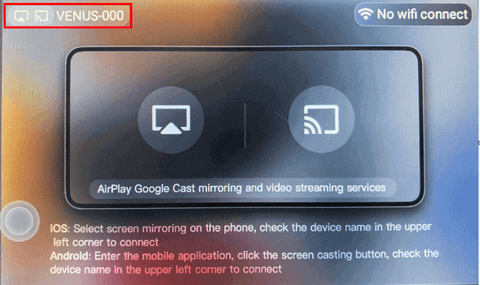
- Tap the "Cast" icon in your phone's app > Select the device name to connect.

- Tap the Cast icon > Check the device name in the upper left corner.
- How to use mirroring
Before you begin, make sure the Box is connected to the same Wi-Fi network as your phone or that the Box is connected to the phone's access point (Settings > Wi-Fi).- Tap the Mirror icon > Select the icon corresponding to your phone's system

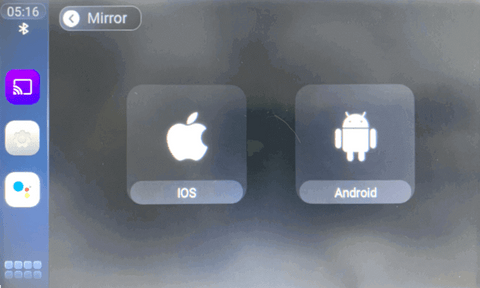
- Tap the "Screen Mirroring" icon on your phone > Select the device name to connect
- Tap the Mirror icon > Select the icon corresponding to your phone's system
9. Dash Cam Installation Guide 2025
Installing a dashcam is a smart investment in your vehicle's security. In this guide, we'll explain two methods: using a cigarette lighter adapter (CLA) or a direct wiring approach. We'll also address common questions to ensure a smooth installation process.

How to Install a Dash Cam?
Using the cigarette lighter adapter (CLA)
This installation method is simple and convenient, requiring no modifications to the vehicle's electrical system, but it may result in an unstable power supply for the dashcam. The installation steps are as follows:
1. Choose the installation location for the dashcam, generally recommended behind the rearview mirror, in the center of the windshield, for an optimal viewing angle.
2. Clean the installation location on the windshield, attach the mounting bracket and place the dashcam on the bracket.
3. Connect the cables to the dashcam.
4. Guide the power cable by sliding it behind the headliner and rubber seal along the A-pillar, downwards, passing under the dashboard.
5. Plug the power cord into the cigarette lighter socket.
6. Insert the memory card into the dashcam, start the car and the camera will begin recording.
Direct wiring method
This installation method can provide a more stable power supply and does not occupy the cigarette lighter socket, but it requires more installation steps and modifications to the vehicle's electrical system, which may require professional skills or qualified personnel. The steps are as follows:
1. Required Tools
- Direct wiring kit
- Test screwdriver
- Long pliers
- Key
- Trim removal tool
2. Locate the mounting points
Choose the camera location: usually behind the rearview mirror, in the center of the windshield.
3. Install the dashcam mount
Clean the chosen location, stick the bracket on and install the dashcam on it.
4. Locate the fuse box
Locate the fuse box and ground point, often under the dashboard on the driver's or passenger's side.

5. How to install the dashcam cable
Connect the cables to the dashcam and route the power cable. Run it along the headliner, from the A-pillar rubber strip, to the fuse box, avoiding the airbag wiring.

⭐Note: In the direct wiring kit, the yellow wire is for the battery, which must be connected to a constant fuse location. The red wire is for the ACC, which must be connected to an ACC location, and the black wire is for ground, which must be connected to a ground point.

6. Connect to the ground point
Loosen the ground point screw, connect the black ground wire from the direct wiring kit and tighten the screw.

7. Find a permanent fuse location
Turn off the ignition, use the tester to detect a location that remains live.

8. Install the fuse
Use long pliers to remove the fuse, install it in the yellow battery wire of the direct wiring kit.

9. Insert the yellow battery wire into the original fuse slot.

10. Connect the ACC port
Use the tester to locate a location that is only powered when the ignition is on. Remove the fuse, install it in the red ACC wire of the direct wiring kit, and insert the wire into the original fuse location.
⭐Note: The camera now has a constant power supply and the built-in voltage cutoff function will protect your battery.
11. Use cable ties to secure excess power cable.
12. Test the dashcam
Insert the memory card into the dashcam, turn it on and configure it.
Summary
With this comprehensive guide and answers to frequently asked questions, you can confidently install a dashcam in your car, improving driving safety. A properly installed dashcam ensures you capture important footage when needed.

FAQ on installing dashcams
1. Where should I install a dashcam?
Ideally, position the dashcam behind the rearview mirror to minimize obstruction and maximize visibility.
2. How much does it cost to install a dashcam?
DIY installation is usually inexpensive, mainly including the camera and necessary accessories. Professional installation may incur additional costs.
3. Does installing a dashcam void the warranty?
In most cases, installing a dashcam does not void your vehicle's warranty. However, it's wise to check your warranty terms to avoid any potential issues.
4. How long does the installation take?
Installation time varies depending on the method chosen and the complexity of the vehicle, generally from 30 minutes to 2 hours.
5. How can I conceal the cables for the dashcam?
Conceal camera cables along vehicle trim or headliner using cable clips, hook and loop fasteners, or cable channels for a neat and professional installation.
6. Is professional installation required?
Although DIY installation is possible, professional installers offer additional expertise for optimal placement and functionality.
Looking for the best dashcam ? Discover Aoocci Dashcam 2024 for a wide selection and reliable performance.
10. Clear Android Auto Cache and Storage
The wireless CarPlay box is a device that allows you to add Apple CarPlay functionality to vehicles that do not support CarPlay.
What is Android Auto?
Android Auto is an advanced software system that facilitates seamless integration between Android devices and vehicle infotainment systems. This technology allows users to access a wide range of features and apps from their smartphones directly on the car's dashboard screen. With the power of voice commands and a simplified interface, Android Auto allows drivers to stay connected while keeping their attention on the road, making driving safer and more convenient.
What is a Cache?
In Android Auto, the data and files necessary for the application to function correctly are crucial. The cache acts as a temporary repository for this important data, including application preferences, temporary files, and other relevant information, helping Android Auto run smoothly. By efficiently managing and accessing this stored data, the cache greatly contributes to an improved user experience and reduced processing time, ensuring more responsive and efficient overall performance.
Why should I clear the Android Auto cache?
With continued use of Android Auto, excessive storage data accumulation can potentially lead to various performance issues, including system slowdowns, freezes, and delayed response times. This heavy storage usage can result in a cluttered system, negatively impacting the overall user experience and potentially causing system instability. However, regularly clearing Android Auto's storage offers several benefits. In addition to freeing up valuable space, it significantly improves the app's overall performance, ensuring smoother operation and more efficient functionality to enhance the user's driving experience.
How do I clear the Android Auto cache?
To effectively clear the Android Auto cache, you can follow these steps:
1. Open the "Settings" or a similar option available depending on your system.
2. Go to Applications.
3. Tap View all apps.
4. Find and select Android Auto.
5. Go to Storage and cache.
6. Tap Clear storage and Clear cache.
However, it is crucial to consider essential precautions and warnings before proceeding with the clearing process. Users should be aware of the potential impact this action can have on their Android Auto system, as clearing storage could lead to the deletion of temporary data, temporarily affecting app performance. By understanding the implications and taking the necessary precautions, users can ensure a seamless clearing process that contributes to optimized performance and the longevity of their Android Auto system.
11. No Sound in the CarPlay Smart Box System
After your smartphone is connected to the CarPlay Smart Box, there is no sound. How do I fix this problem?
1. Lock the phone, then turn on the screen, and click the AirPlay button on the phone screen;

2. There will be at least two connection channels: one is Carplay; the other is Bluetooth.
- CarPlay means the AUX configuration channel of the CarPlay system
- Bluetooth means the car's original Bluetooth audio channel

3. The sound problem is usually caused by incorrect selection of these two channels. Switch to the other channel to resolve the sound issue.
4. There is another solution:
Return to the original automotive system and locate the external device.
Find the AUX channel and the Bluetooth channel. If there is no sound, switch between them.
- Audi: Return to the original car system => Media => AUX-IN;
- Porsche: Return to the original car system => press the 'SOURCE' button => press the 'OPTION' button => select 'SET MEDIA/AUX';
- Mercedes-Benz: Return to the original automotive system => (NTG4.5) in Engineering Mode;
- BMW: Return to the original automotive system => Multimedia.
5. What if I don't see the AUX option/channel in my original car system?
- Go to the car dealership to activate the AUX option;
- Obtain an AMI-AUX cable to activate the channel. If you need to purchase a cable, please check the following link:
12. How do I replace the battery in the wireless controller?
Peel back a layer of sticker on the back of the remote control, the screws will be exposed, and you can replace the battery with a new one by removing the screws one turn.
Do you need personalized help?
Our support team is here to help. Feel free to contact us at support-fr@aoocci.com